
A clean install wipes the drive and puts a fresh copy of Windows 10 on it — no leftover files, no old drivers, no accumulated junk. It is the reliable fix when a PC has become slow, keeps crashing, or has picked up something a scan cannot remove, and it is what you do after replacing a drive or building a machine from parts.
This guide walks the whole job: backing up first, building the USB installer, wiping the drive, and activating afterwards. Every step has the screen you will actually see.
One thing to know before you start. Microsoft ended free support for Windows 10 on 14 October 2025. A clean install still works exactly as described below, and the machine will run fine — but it will not receive new security updates unless you are enrolled in Microsoft’s paid Extended Security Updates programme. If that changes your mind, read what to do now that Windows 10 support has ended before you wipe anything.
When you actually need a clean install
A clean install is worth the effort when:
- the PC is slow or unstable and a reset has not helped
- malware keeps coming back after removal
- you replaced the drive, the motherboard, or built a new PC
- the machine came with software you cannot fully remove
- you are handing the computer to someone else
It is not the fix for a single misbehaving program, and it is not needed just to change your product key — you can do that in place with a single command.
Before you start: what you need
- A USB stick of 8 GB or more. Everything on it will be erased.
- Your 25-character product key, or a machine whose licence is already tied to it. If you are not sure you have it, see how to find your Windows product key before you wipe the drive — afterwards is too late.
- A second PC or a working internet connection on this one, to download the installer.
- Somewhere to put your files. External drive, second internal drive, or cloud storage.
- An hour, give or take, depending on your drive speed.
Know which edition your key is for, too. A Windows 10 Pro key will not unlock Windows 10 Home and the other way round, and Setup asks you to choose. If you are undecided, Windows 10 Home vs Pro lays out the differences.
Step 1: Back up everything you want to keep
This is the step people skip and then regret. A clean install deletes the partition — documents, photos, browser profiles, saved games, licences for other software. None of it comes back. Do the backup first, then verify you can actually open a file from it.
Pick whichever of the three methods below suits what you have to hand.
Option A: Sync your folders to OneDrive (easiest)
Windows 10 has OneDrive folder backup built in, so this needs no extra software. Open Settings → Update & Security → Backup, then under “Back up files to OneDrive” click Back up files.
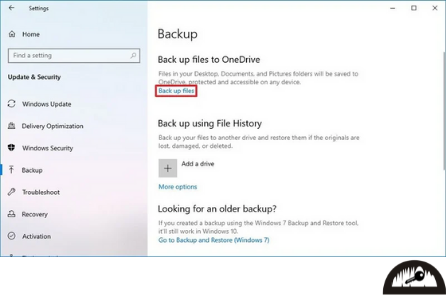
Choose which of Desktop, Documents and Pictures to include, check the space figure against your OneDrive allowance, and click Start backup.
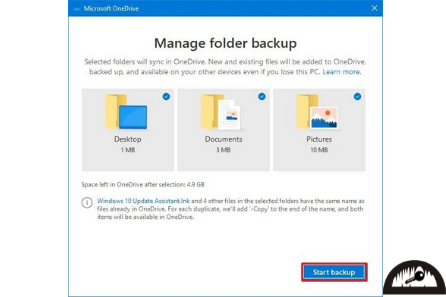
This covers those three folders only. Anything you keep elsewhere — a projects folder on D:, downloads, a game library — needs one of the other two methods.
Option B: Copy your files to an external drive
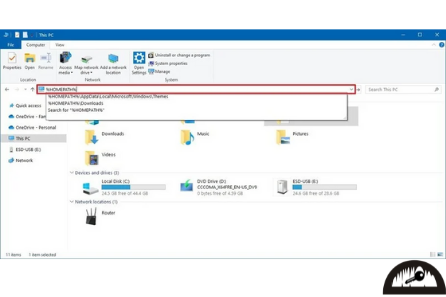
The most direct method, and the one that lets you see exactly what you saved. Plug in the drive, open File Explorer, and type the folder you want into the address bar — typing %userprofile% takes you straight to your user folder.
On the Home tab click Select all.
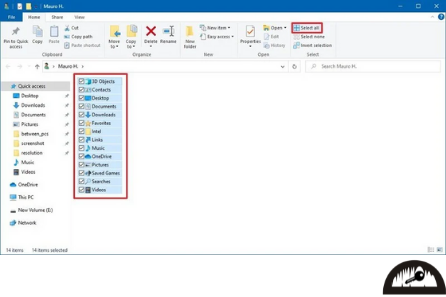
Then Copy to → Choose location, point it at your external drive, and click Copy.
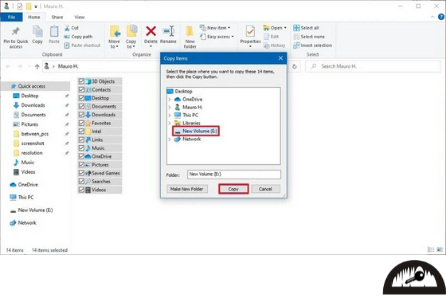
When it finishes, open a couple of files from the copy. A backup you have not opened is not a backup yet.
Option C: Make a full system image
An image captures the whole installation — Windows, programs, settings, files — so you can put the machine back exactly as it was if the clean install goes sideways. Open Control Panel → Backup and Restore (Windows 7) and choose Create a system image, then pick a hard disk as the destination.
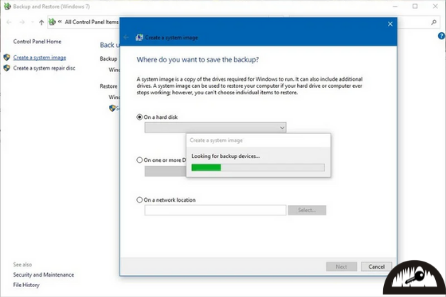
The same tool exists in Windows 8.1 and Windows 7, so it works if you are coming from an older version. Belt and braces: make an image and copy your important files separately.
Step 2: Create a bootable Windows 10 USB
Microsoft’s own Media Creation Tool builds the installer for you — no third-party software needed. Go to the Windows 10 download page and click Download tool now, then run the file you get. All the download links we use are collected on our software download links page if you would rather start there.
Accept the licence terms, then choose Create installation media (USB flash drive, DVD, or ISO file) for another PC — not “Upgrade this PC now”.
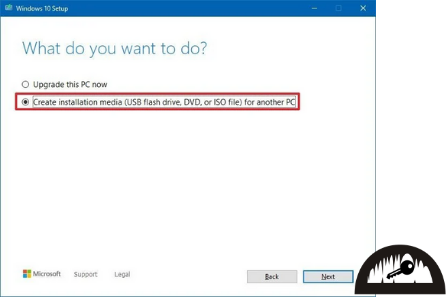
Set language, edition and architecture — leaving “Use the recommended options” ticked is right for most people — then select USB flash drive.
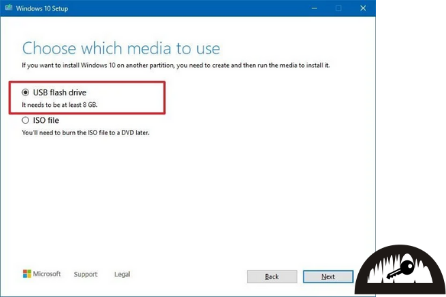
Pick your stick from the list — if it is missing, reconnect it and click Refresh — and let the tool download and write the files. Expect fifteen minutes or more depending on your connection.
Step 3: Boot from the USB
Leave the USB plugged in and restart. As the PC powers up, press the boot-menu key — usually F12, sometimes F9, F11, Esc or Del depending on the manufacturer — and choose the USB drive. If you land back in Windows instead, the boot order needs changing in UEFI/BIOS (usually F2 or Del at startup).
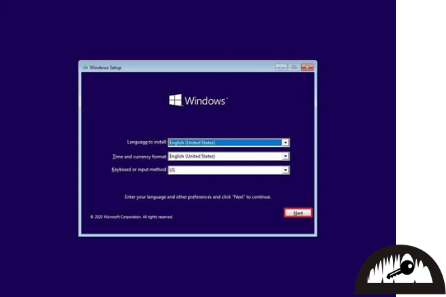
When Setup loads, confirm language, time format and keyboard, then click Next.
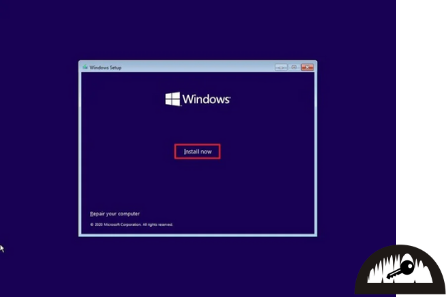
Click Install now.
At the product key screen you can click I don’t have a product key and activate later — that is often simpler, because it lets you get the install finished first. Then choose the edition that matches your key.
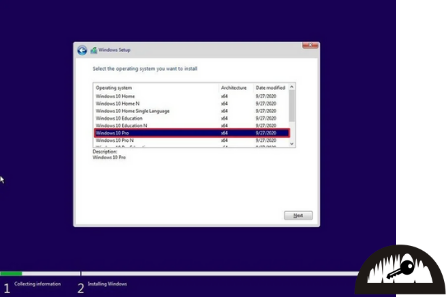
Step 4: Wipe the drive and install
Accept the licence terms, then pick Custom: Install Windows only (advanced). The Upgrade option keeps your old files, which is the opposite of what you want here.
You will see the partitions on your drive. Select each partition on Drive 0 and click Delete until only unallocated space is left. There are usually three or four — System, Reserved, the main partition and a Recovery partition — and all of them have to go for Windows to use the whole drive.
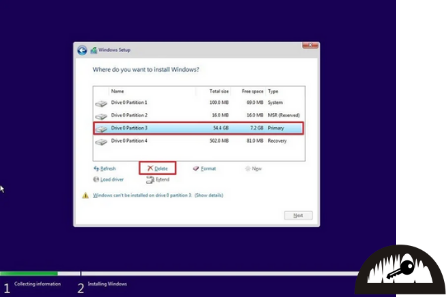
If you have a second drive with data on it, leave its partitions alone. Deleting them is not needed and will cost you those files.
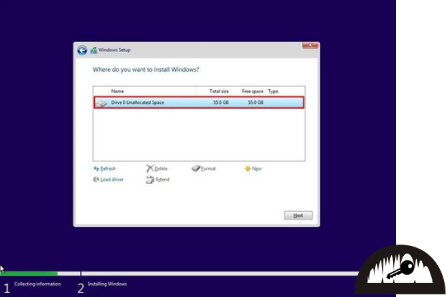
Now select Drive 0 Unallocated Space and click Next. Setup creates the partitions it needs and starts copying files. The PC restarts on its own a few times — leave it alone.
When the copying is done you land in the out-of-box experience: region, keyboard, network, Microsoft account, privacy choices. It is all on-screen prompts, and none of it affects activation, so answer as you prefer. Pull the USB out once you reach the desktop.
Step 5: Activate Windows 10
Open Settings → Update & Security → Activation, choose Change product key, and enter your 25-character key. It takes a few seconds.
Step-by-step screens for both editions are here: how to activate Windows 10 Pro and how to activate Windows 10 Home. To confirm it worked, see how to check whether Windows is activated.
Installed Home but your key is for Pro? You do not need to reinstall — follow how to upgrade Windows 10 Home to Pro instead.
Windows 10 or Windows 11 on this machine?
Since you are wiping the drive anyway, it is worth asking. Windows 10 stopped getting free security updates on 14 October 2025; Windows 11 is still supported and receiving them. If the hardware qualifies, installing Windows 11 now saves you doing this twice.
The requirements are stricter — a supported 64-bit processor, 4 GB of RAM, 64 GB of storage, TPM 2.0 and UEFI Secure Boot. Take two minutes to check whether your PC is compatible with Windows 11. If it is, a Windows 11 Pro key and the same USB method get you there.
If the PC does not qualify, or you need Windows 10 for a specific program or piece of hardware, carry on with this guide. Plenty of machines run it for exactly those reasons.
If something goes wrong
- The PC boots into Windows instead of the USB. The boot order is still favouring the internal drive. Change it in UEFI/BIOS, or use the one-off boot menu key at startup.
- “Windows cannot be installed to this disk.” Usually a partition-style mismatch. Deleting every partition on Drive 0, as in Step 4, clears it.
- Setup does not see your USB stick. Try a different port — USB 2.0 ports are often more reliable during setup than USB 3.x.
- The key is refused after install. Check the edition matches first. If it still will not take, look the code up in our activation error code decoder, then open a support ticket with the exact message. Every key we sell carries a 7-day activation warranty.
Frequently Asked Questions
Will a clean install delete my files?
Yes. It deletes the partition and everything on it. Back up first — Step 1 covers three ways to do it.
Do I need a product key to reinstall Windows 10?
Not to install it. You can click “I don’t have a product key” and finish setup, but you need a genuine key to activate afterwards.
What size USB stick do I need?
At least 8 GB. Anything already on it will be erased.
Which edition should I install?
The one your key is for. A Pro key will not activate Home, and Setup asks you to choose before it copies any files.
How long does it take?
Roughly 20 to 40 minutes on an SSD once the USB is ready, longer on a mechanical hard drive. Building the USB adds fifteen minutes or so.
Can I still install Windows 10 now that support has ended?
Yes — the installer works and the licence activates as normal. What you do not get is new security updates. See Windows 10 end of support: what to do for the options.
Do I need to remove my old partitions manually?
Yes, if you want a genuinely clean drive. Setup will install alongside the old files otherwise, leaving a Windows.old folder eating space.
Where to get a genuine Windows 10 key
If you need a key for the machine you are reinstalling, ours are genuine perpetual licences for one PC, delivered instantly on your order confirmation page — and available again any time from Track Orders with your order number and email.
- Windows 10 Pro — BitLocker, Remote Desktop, domain join, Hyper-V
- Windows 10 Home — everything most home PCs need
Every key is backed by a 7-day activation warranty and free help getting it activated.